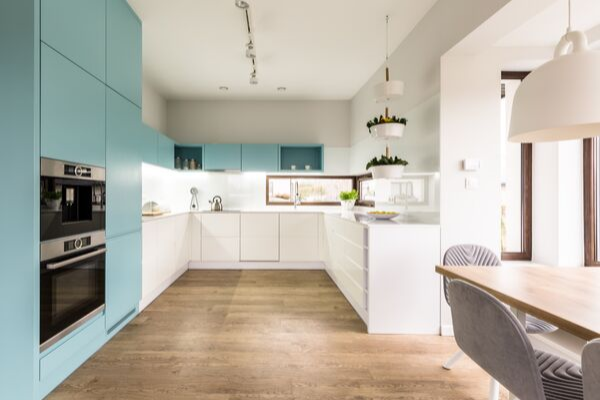
We’re at the end of a 7-year renovation and ready for a well-deserved holiday. We’ve made a lot of savings and yes, a few mistakes along the way. I’ve decided to start blogging about my experience as ‘background’ girl in this project. I’m in charge of budgeting, sourcing materials, as well as admin, plans and permits. I’m also documenting hubby Richard’s trade journey. We’re both super excited this project is ending because we’re going on a holiday soon. We’ve made a lot of sacrifices over the years. So, yippee! Well, we’re looking at holidays online anyway. So that’s a start.
I’m writing this article because I’ve heard some kitchen horror stories. Some people are paying between $14,000 and $30,000 for basic new kitchens. The cost is actually in the ‘project management’ rather than the materials themselves. If you are willing to do the project management yourself, you will save thousands.
Before I get started on how we created a dream kitchen and ‘heart of our home’ with appliances for under $5k, here are a few of my biggest tips.
Of course, we learned them in hindsight – but I’d like to save you the heartache and pitfalls.
Some ground rules

Rule #1: Have the goal to save more money than you spend
Our project took us a while because we funded it out of wages, rather than ripping equity out of the home. This puts us in a good position now, when coming to sell because all that money we invested, we’ll get back tenfold. It isn’t a bad thing sitting on a home while renovating. Your home is going up in value the whole time and this allows you to take breaks along the way.
Rule#2: Don’t be in a hurry
Unless you are an experienced renovator, it is important to not do much in the first six months of a renovation. It takes time to get a feel for what a home needs. You need to live in that home a while to understand what’s good about the place and what’s not. If you rush in and renovate, you may not discover the hidden gems. Nor will you understand why the previous owners did what they did.
Rule #3: Never pay full price and shop, shop, shop around
Well, this is part of my mantra as a savings blogger, but stick to this rule. We never paid full price for anything. We’d start with an item full price and then try to find it elsewhere for at least half its value if not more. Again – patience is key.
Rule #4: Be Prepared to Inconvenience yourself
If you have to drive 40 minutes with two of your hubby’s mates in the car to pick up a $100 Caesarstone benchtop – do it. That Saturday trip, will save you at least $2900 and is well worth the effort. Oh and here’s a bigger tip: Take three mates. Caesarstone benchtops are very heavy! We learned that the hard way.
Prepare for hard work and living in a dirty-grimy renovation environment
Here’s what you need to know:

Ok. Let’s get into it. Here’s how we created our dream kitchen for a song!
- Be prepared to work hard. It will pay off. We worked many long hours on our renovation. Hubby did all the trade work himself (except for electrics and plumbing). He learned how to do everything asking trade mates and watching YouTube videos. I did a lot of the moving of stuff (actually that’s been my life for years) while hubby worked in the day. I always pre-empted the next stages of renovation. This was so hubby could get straight to work on weekends when he had time. I looked after the kids on weekends, keeping them occupied, while we hubby got jobs done.
- Renovations are hard on the kids. Schedule in breaks around renovation stages. Plan weekends well, so kids are either helping or occupied with friends or activities. Also schedule in quality family time away from the renovation. For example, bike rides and picnics in the park. It’s important to keep everyone connected and happy throughout the long renovation process.
- Living in a renovation is hard. You will live a life of dust-and-grime for years. You’ll become obsessed with cleaning (like I did) so you can feel normal. Keep a tidy ship as best you can.
Your essential guide to a dream kitchen with appliances for under $5k
Important research tips
- New stuff: Research can take a while. When shopping for new supplies (e.g kitchen cabinets) go to google and punch in what you need. Then go to ‘shopping’ and ‘sort by price.’ This will bring up the cheapest vendor for that item.
- Secondhand stuff: Our ‘go-to’ places for secondhand stuff are
- Facebook Marketplace: My hubby loves Facebook marketplace. First, people turn up to take your old stuff for cash. Second, you don’t have to travel far to grab renovation supplies from others.
- Gumtree: Still an oldie and a goodie for all things secondhand. I always find gems on Gumtree. Gumtree is great for finding local kitchenware suppliers who are selling it cheaper.
- Tip store in a neighbouring town: We travel 15 minutes up a highway to a large secondhand shop next to a local tip. The area is a ritzy, so the secondhand goods are always high quality, but the goods go for a song.
Demolition – how to do it
- Before you rip the old kitchen out, know the materials in your kitchen. Old vinyl flooring and walls can be asbestos-filled. Seek professional advice from a builder about what is hiding in your kitchen.
- We used our old laundry, which is near our kitchen, as a kitchen while renovating. This worked fine as an interim kitchen.
- Don’t rip up the entire kitchen. You can still use cupboards for food storage, while completing the sink area for example. Do areas of the kitchen in stages. Be prepared to bring in temporary storage. For example, I grabbed a large white pantry from a tip store, and we used that for all our food while renovating.
- Demolition is so much fun and a great stress release. I love it and it was one of the most fun parts of our renovation. Be safe, wear safety masks and glasses. Try to do it when the kids aren’t home.
Costing – what we did and how we saved (in order of timing)
Kitchen cabinets and pantry: $1804
Tip: If you project manage your own kitchen, you will save big $$$
It took me a while to get the kitchen cabinets pricing right. I did a lot of shopping around. There was always the weighing-up of quality versus price. I ended finding a supplier on Gumtree – in one of their adverts.
First, create a 3D scale sketch and layout of the kitchen (pictured here) to give them specifics. There are plenty of apps and online sites for doing this. A simple sketch on paper (top view) will do too. You’ll need to do this first.
One thing to note, you’ll need side-panels, kickboards and spacers when buying cabinets. As well as handles. You can buy handles online at very reduced prices. Factor this in too. Side panels are around $30 each, back panels for islands are around $160 (which we didn’t need). Allow around $300 for extras.
- 4 x 800mm cabinets $160 each = $640
- 1 x 900mm cabinet $166 each – $166
- 1 x 800mm drawers = $292
- 4 x lge pantry cupboards $99 each = $396
- 1 x extras – side panels, kickboards, handles = $300
Cabinet Installation: DIY
If you can’t install the cabinets checkout Airtaskers offering this service. Or go to an online trade site like Hi-Pages. You can get a tradie for a day for between $200-$400 for putting cabinets together. Some tradies jump on sites like this to fill gaps between bigger jobs. So this a win-win usually because they’d usually work for more. Many specialise in Ikea kitchens but can usually do other similar kitchens. Checkout installation services before investing in your cabinets. You need to make sure you installation experience runs well and doesn’t go over budget. I’m lucky – my very skilled hubby installed ours.
Kitchen Bench, Sink and Installation: $510
- Benchtop: You can pick up very cost-effective benchtops at places like Bunnings. We actually got ours at the Masters closing down sale. It was around $300. But if you’re not handy, you will need to factor in a cutting service. Bunnings standard 2400x900mm white bench includes a cutting service. The price is $541.
- Sink: Also factor in cutting the hole for the sink. Plumbers can usually help with that, as well as the cost of getting the sink plumbed up. It took our plumber about two hours to get ours all sorted. Roughly $200. We got lucky with the sink itself. I found a brand new double sink at my tip store for $10. This was very good find indeed.
Big tip: Avoid square-cornered sinks on eBay. They are cheap but horrible to use as the food doesn’t drain into the sink hole. Go for modern looking sinks with curved basins that drain water out well.
Penina Petersen – Reno Savers
Large 1200mm (not 900mm) wide benchtop $200:
Richard scored some high-quality bed heads for FREE from a home demolition on Gumtree. He cut them to size and built the base of our bench. The approximate cost was $200 for the base including materials, paint and silicon. Note: Caesarstone benches can cost up to $3000 for ones that are only 900mm wide.
We wanted a big family ‘feast table’ as the heart of our home. We achieved it at such a low cost and guests love, love, love sitting at our big feast table. It’s a real hit when we’re entertaining. Everybody gravitates to our big bright bench. We have so much fun here. It’s also a spot where the kids do their homework. We tell stories and of course, enjoy a lovely meal together every night. Happiness doesn’t have to cost the Earth.
Pendant Lights $120:
We did a lot of homework on the lights. We picked them up for around $40 each online. Note: If you are buying lights from China make sure they are Australian standard. Check with an Australian electrician before buying anything electrical from China.
Splashbacks $240:
Splashbacks look awesome but can be costly. A toughened glass splashback will set you back about $450 – $600 per metre. A standard splashback can set you back over one thousand dollars. If you buy tiles you will also have to pay for labour.
We wanted a splashback to style our kitchen but didn’t have the budget to pay too much. We wanted a stylish and classic (not overdone) look-and-feel. We ended up settling on Rivet Pressed Metal, which Richard painted white. These come in long sheets suitable for a splashback. We purchased two and Richard cut them down to size. I recently discovered you can get these already painted white at $120 each. If you’re not handy, hire a handyman on Airtasker to do the cutting and measuring for you. This doesn’t add too much to that cost. Make sure you hire someone with excellent reviews of course.
Etiquette Tip:
Penina Petersen – Reno Savers
You could ask a handy friend to help. Of course, you must insist on paying your friend. No-one likes being taken advantage of. People should always receive fair compensation for their good work. Good friends will usually give you mates rates anyway. Don’t even go there if you think the ask will affect the friendship. Keep a good level of etiquette when enlisting help from well-meaning friends.
New rangehood $50:
I found a guy on Gumtree who was cleaning out his mother’s garage. I drove 30 minutes to pick it up. It was in perfect condition and never used. Richard spent a Saturday afternoon installing it.
900mm Oven and Installation $1639:
Ovens are something you should buy new. Then they’ll last the test of time. We shopped around and settled on a Technika 900mm dual-fuel oven. It is was the cheapest at $1389. We had it delivered for $50 and had our plumber install it for $200.
Recycled Coffee Tea Station Cupboard: FREE
Finally, we saved on the cost of an extra cabinet by recycling some more of the wooden bed heads we found. Hubby made a stylish square open cupboard for our coffee and tea. Again FREE.
Brand new $2500 fridge: FREE (Think outside the square)
This was our super special move. Since we are living in a renovation we needed to remove around 3000 bricks from our backyard. My husband discovered on Facebook marketplace that our bricks were worth good money. They were worth at least $1 each. My husband advertised the bricks on Facebook marketplace. People came from all over Melbourne (and beyond) to collect them. There wasn’t a day that went by, that I didn’t see a new person in our backyard. Each with wheelbarrows full of bricks. We also met a bunch of lovely people in the process. For a month, our little backyard was a hub of excitement. We collected $2500 for the bricks and used the money to pay for our black fridge. It was such a win-win and a great way to recycle. It was so cool to use our new fridge after the process was over.
Happy Renovating!
So there you have it. You can have your dream kitchen and put those hard-earned dollars away for a holiday. I hope you enjoy your renovation ride. The hard work and savings sure are worth it!
Need more money for your renovation project?
Think outside the square by eating your way to a fatter wallet with Dollar Dinners.


 YOU
YOU


 Money
Money


 FOOD
FOOD





 FAMILY LIFE


 HOME & GARDEN


 ORGANISE

 EVENTS


 LIFESTYLE

